Access Your Raspberry Pi From Anywhere On Windows 10: The Ultimate Guide
The Raspberry Pi, a marvel of miniature computing, has revolutionized how we approach everything from home automation to educational coding. But what if you need to access your Pi when you're not physically next to it? Perhaps you're managing a home server, controlling smart devices, or running applications remotely. In today's interconnected world, accessing your Raspberry Pi from anywhere on Windows 10 has become a necessity for remote projects, IoT setups, and remote development.
Imagine being able to troubleshoot a smart garden system while on vacation, or deploying a new feature to your home media server from your office. This powerful capability opens up endless possibilities for remote control, monitoring, and automation. The benefits of remote access extend far beyond mere convenience; it offers flexibility, efficiency, and peace of mind.
This article is tailored for anyone who wants to access their Raspberry Pi remotely from anywhere using Windows 10. We’ll cover everything from basic setup to advanced configurations, ensuring that you’re equipped with all the knowledge you need. It’s easier than you think, but there’s a lot to unpack. In this guide, we’ll break it down step by step so even beginners can follow along. Trust me, by the end of this, you’ll feel like a tech wizard!
Why Remote Access Your Raspberry Pi?
Before diving into the "how," let's solidify the "why." Your Raspberry Pi is a versatile little computer, capable of handling a myriad of tasks. However, its small size often means it's tucked away in a corner, connected to a sensor array, or serving as a headless server. Physically connecting a monitor, keyboard, and mouse every time you need to interact with it is simply impractical.
Remote access liberates your Pi from its physical constraints. Whether you're tinkering with IoT projects or just want to control your home setup remotely, knowing how to access Pi from anywhere on Windows 10 can save you a ton of time and headaches. This capability is crucial for:
- IoT Projects: Monitoring sensor data, controlling smart devices, or updating firmware on your connected gadgets from a distance.
- Home Servers: Managing your media server, network-attached storage (NAS), or home automation hub without needing a dedicated display.
- Remote Development: Coding and testing applications directly on your Pi, even when you're not at home.
- Educational Purposes: Allowing students or collaborators to access a shared Pi for learning or project work.
- Automation: Setting up and managing automated tasks, backups, or security systems remotely.
In essence, remote access transforms your Raspberry Pi into a truly independent and globally accessible device.
Core Concepts for Remote Pi Access
To remotely control your Raspberry Pi from any device connected to the internet, you need a method to bridge the gap between your Windows 10 PC and your Pi. There are several fundamental approaches, each with its own advantages:
1. SSH (Secure Shell) for Command Line Access
SSH is the workhorse for remote command-line access. It provides a secure channel over an unsecured network by encrypting the connection. With SSH, you can run commands, transfer files, and manage your Pi as if you were sitting right in front of it, but through a text-based interface.
Good news for Windows 10 users: The SSH client is enabled by default in Windows 10 from the April 2018 Update (Windows Version 1803). This means you don't need to install extra software for basic SSH connectivity, though specialized clients can offer more features.
2. VNC (Virtual Network Computing) for Desktop Access
If you prefer a graphical user interface (GUI) over the command line, VNC is your go-to solution. VNC allows you to see and interact with your Raspberry Pi desktop directly from your Windows 10 machine, just as if you had a monitor plugged in. This is particularly useful for tasks that require visual feedback, like browsing the web on your Pi or using GUI-based applications.
3. Cloud Services and VPNs for "Anywhere" Access
While SSH and VNC are great for local network access, reaching your Pi from outside your home network requires a bit more setup. You can expose SSH or VNC on your Raspberry Pi over the open internet (though this is generally not recommended due to security risks), within a VPN (Virtual Private Network), or by using an external service.
- VPN: A VPN creates a secure, encrypted tunnel between your Windows 10 PC and your home network, making it seem as though you are physically connected to your home network. This is a highly secure method.
- External Services: These services handle the complex networking for you, providing a secure and easy way to connect without dealing with port forwarding or dynamic IP addresses.
Connecting Raspberry Pi to Windows 10: Initial Setup
Now that your Pi is ready (meaning Raspberry Pi OS is installed and it's connected to your network), it’s time to connect it to your Windows 10 machine. To access the Raspberry Pi, you will need its username (usually `pi`) and its IP address. You can find the IP address by running `hostname -I` on the Pi's terminal or by checking your router's connected devices list.
Using PuTTY for SSH Access
For many, the easiest way to establish the initial SSH connection is by using a tool called PuTTY. Think of PuTTY as the bridge that connects your Windows 10 PC to your Raspberry Pi.
- Download PuTTY: Visit the official PuTTY website and download the appropriate installer for your Windows 10 system.
- Open PuTTY: Once installed, launch PuTTY.
- Enter Pi's IP Address: In the "Host Name (or IP address)" field, enter your Pi’s IP address. Ensure the "Port" is set to 22 (the default for SSH) and "Connection type" is set to SSH.
- Save Session (Optional): You can save this session for future use by giving it a name under "Saved Sessions" and clicking "Save."
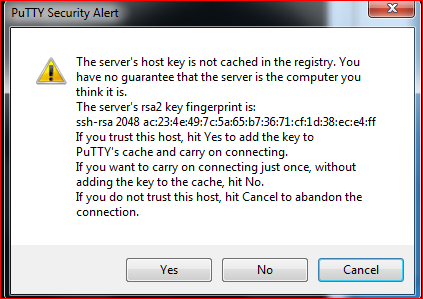
- Open Connection: Click "Open." You might see a security alert if it's your first time connecting; accept it.
- Log In: A terminal window will appear, prompting you for your username (default is `pi`) and password. Enter them, and you'll be connected to your Pi's command line.
Using Windows 10's Built-in SSH Client
As mentioned, Windows 10 has a built-in SSH client. You can use it directly from PowerShell or Command Prompt:
- Open PowerShell or Command Prompt.
- Type `ssh pi@YOUR_PI_IP_ADDRESS` (replace `YOUR_PI_IP_ADDRESS` with your Pi's actual IP).
- Press Enter. If prompted about the authenticity of the host, type `yes` and press Enter.
- Enter your Raspberry Pi's password when prompted.
You are now connected to your Raspberry Pi's command line!
Accessing Your Pi from Anywhere: The Cloud Solution
While PuTTY and the built-in SSH client are excellent for local network access, they don't inherently allow you to connect from outside your home network without complex router configurations like port forwarding. This is where cloud-based remote access solutions shine.
RealVNC Connect (Cloud VNC Viewer)
RealVNC Connect is a secure remote access solution for Raspberry Pi OS, allowing you to connect to your Raspberry Pi desktop and command line directly from any browser or VNC Viewer application. It’s designed to simplify "anywhere" access.
The beauty of RealVNC Connect is that there's no need to struggle with port forwarding or the need to remember IP addresses. Once you’ve set up cloud connections, you can access your Pi via remote desktop from anywhere with internet access. Just sign in to your RealVNC account and you’re good to go.
Here's a general overview of how it works:
- Install VNC Server on Pi: Raspberry Pi OS often comes with VNC Server pre-installed or easily installable. Enable it through `raspi-config`.
- Sign up for RealVNC Connect: Create an account on the RealVNC website.
- Link Pi to Account: Follow the instructions within VNC Server on your Pi to link it to your RealVNC account. This creates a secure cloud connection.
- Download VNC Viewer on Windows 10: Install the RealVNC Viewer application on your Windows 10 PC.
- Connect: Open VNC Viewer, sign in with your RealVNC account, and your linked Raspberry Pi will appear. Click on it to establish a remote desktop connection.
This method provides a reliable URL to connect to your Pi, abstracting away the underlying network complexities.
Raspberry Pi Connect
Another excellent option provided directly by the Raspberry Pi Foundation is Raspberry Pi Connect. This is a free screen sharing and remote shell service provided by Raspberry Pi. It offers a straightforward way to get remote access without much hassle, focusing on simplicity and direct integration with the Raspberry Pi ecosystem.
While the exact setup steps might evolve, the general idea is to enable and configure Raspberry Pi Connect on your Pi, then access it via a web browser or a dedicated client on your Windows 10 machine, leveraging your Raspberry Pi account.
Chrome Remote Desktop (Complementary Use)
While primarily for PC-to-PC remote access, some users leverage Chrome Remote Desktop in a complementary fashion. For remote access, I also use Chrome Remote Desktop on my phone or tablet to remote into my Windows PC. If you're running Raspberry Pi OS with Chromium, and Chrome Remote Desktop, you could potentially set up a chain: phone/tablet to Windows PC, then Windows PC to Pi via another method. This is less direct for Pi access but can be part of a broader remote setup strategy.
Putting It All Together: A Step-by-Step Summary
Accessing your Raspberry Pi remotely from anywhere on Windows 10 is a powerful capability that opens up endless possibilities. Here’s how you can achieve it:
- Prepare Your Raspberry Pi:
- Ensure Raspberry Pi OS is installed and up-to-date.
- Connect your Pi to your home network (Wi-Fi or Ethernet).
- Enable SSH (via `sudo raspi-config` -> Interface Options -> SSH).
- Enable VNC Server (via `sudo raspi-config` -> Interface Options -> VNC) if you want graphical desktop access.
- Note down your Pi's IP address (`hostname -I`) and username (default `pi`).
- Initial Connection from Windows 10 (Local Network):
- Use PuTTY or Windows 10's built-in SSH client to connect to your Pi's command line using its IP address and username/password. This confirms basic connectivity.
- Choose Your "Anywhere" Remote Access Method:
- For easy, secure cloud access (recommended for beginners):
- Sign up for RealVNC Connect.
- Link your Pi's VNC Server to your RealVNC account.
- Install RealVNC Viewer on your Windows 10 PC and sign in.
- Your Pi will appear, ready for remote desktop or command line access.
- For Raspberry Pi's native cloud solution:
- Explore and set up Raspberry Pi Connect on your Pi and via the Raspberry Pi website.
- For advanced users (VPN or manual port forwarding - use with caution):
- Set up a VPN server on your home network or Pi.
- Configure your router for port forwarding (for SSH/VNC), but be aware of the security implications.
- For easy, secure cloud access (recommended for beginners):
- Connect from Anywhere:
- Once you’ve set up cloud connections (e.g., RealVNC), you can access your Pi via remote desktop or command line from anywhere with internet access. No need to struggle with port forwarding or the need to remember IP addresses. Just sign in to your RealVNC account (or Raspberry Pi Connect service) and you’re good to go.
- Finally, it’s time to connect to your Raspberry Pi from your Windows 10 computer, whether you're across the room or across the globe!
Conclusion
In essence, gaining remote access to your Raspberry Pi using Windows 10 is a process that, while involving several steps, is entirely within your grasp. Accessing your Raspberry Pi remotely from anywhere on Windows 10 is a powerful capability that opens up endless possibilities for remote control, monitoring, and automation. Whether you're managing a home server, controlling smart devices, or running applications remotely, this guide has provided everything you need to know to set up seamless access.
By mastering this guide, anyone can achieve remote access and control their Raspberry Pi desktop from anywhere. The flexibility and convenience it offers for remote projects, IoT setups, and remote development are invaluable. So go ahead, unleash the full potential of your Raspberry Pi, and enjoy the freedom of controlling it from wherever you are.

Use Pi Network App on PC! | How to Install Pi Network Windows 10 - YouTube

Part 3 - Accessing Raspberry Pi from SSH via PuTTy in Windows 10 - YouTube
Access Your Raspberry Pi From Outside Your Home or Local Network
