Best Remote IoT Behind Router Raspberry Pi Free: Your Ultimate Guide To Seamless Control
Are you striving to harness the potential of your Internet of Things (IoT) projects, seeking seamless control over your Raspberry Pi devices, and all without incurring hefty costs? Well, you've come to the right place, my friend. With the increasing popularity of remote IoT solutions, managing Raspberry Pi devices behind routers has become common for tech enthusiasts and professionals alike. Imagine being able to control your smart home devices, monitor your security cameras, or even tweak your weather station setup—all from the comfort of your couch or while you're sipping coffee at a café miles away. This isn't a futuristic fantasy; it's entirely achievable, and what's even better, it can be done for free!
This comprehensive guide will explore the best practices, tools, and configurations to help you set up a remote IoT system behind your router using Raspberry Pi. Whether you are a hobbyist, a developer, or a tech enthusiast, understanding how to set up and utilize remote IoT can greatly improve your IoT project's efficiency. Best remote IoT behind router for Raspberry Pi is here to save the day, and we’re about to break it all down for you. This setup is your golden ticket to a smarter life, enabling you to access your Raspberry Pi behind a router and enable smooth device control without breaking the bank.
Why Choose Raspberry Pi for Remote IoT?
Before we dive into the "how-to," let's briefly touch upon "Why choose Raspberry Pi for remote IoT?" Raspberry Pi is more than just a tiny computer—it’s a powerhouse for innovation. Its versatility, affordability, and robust community support make it the perfect brain for countless IoT projects. Here are a few reasons why Raspberry Pi is the perfect choice for remote IoT projects:
- Affordability: Raspberry Pi models start at incredibly affordable prices, making them accessible for hobbyists and professionals alike. Setting up the best remote IoT behind router Raspberry Pi free system is a fantastic way to explore the world of IoT without spending a fortune.
- Versatility: From smart home hubs to environmental sensors, security cameras, and automated systems, Raspberry Pi can handle a vast array of tasks. Its GPIO pins allow easy interfacing with various sensors and actuators.
- Compact Size: Its small footprint makes it ideal for embedding into projects where space is limited.
- Community Support: A massive global community means abundant resources, tutorials, and troubleshooting help are readily available.
- Power Efficiency: Raspberry Pis consume very little power, making them suitable for always-on IoT applications.
The potential for remote IoT VPC SSH Raspberry Pi setups will only grow, and leveraging Raspberry Pi is a smart move for anyone looking to innovate in this space.
The Challenge: Raspberry Pi Behind a Router
So, you have your Raspberry Pi, ready to take on the world, but there's a common hurdle: your router. Most home and office networks use Network Address Translation (NAT), which assigns private IP addresses to devices within the local network. This means your Raspberry Pi is hidden behind your router's public IP address, making it inaccessible directly from the internet. This is a security feature, but it poses a challenge for remote access.
Traditionally, overcoming this involves port forwarding, which can be complex, less secure if not configured properly, and often requires a static public IP address or a dynamic DNS (DDNS) service. However, the good news is that there are free, streamlined solutions that bypass these complexities, allowing you to establish a secure, efficient, and free remote IoT setup with Raspberry Pi.
Your Free Remote IoT Setup: A Comprehensive Guide
How to set up remote SSH IoT behind a router with Raspberry Pi for free? This is where the magic happens. We'll focus on methods that provide robust, free remote access without requiring intricate network configurations like manual port forwarding on your router.
Essential Tools and Concepts
Before we dive into specific methods, let's understand a few core concepts:
- SSH (Secure Shell): This is the primary protocol for securely accessing and controlling your Raspberry Pi's command line remotely. It encrypts all communication, making it safe for remote administration.
- VNC (Virtual Network Computing): While SSH provides command-line access, VNC allows you to see and interact with your Raspberry Pi's graphical desktop environment remotely. Users can set up a VNC server on a Raspberry Pi and use a VNC client application on a device of their choice (computer, tablet, smartphone).
- Remote IoT Solution: This refers to the software or service that facilitates the connection between your remote device and your Raspberry Pi, often bypassing the router's NAT. The free version of the remote IoT solution streamlines the process.
Method 1: Secure Tunnels with Ngrok or Similar Services
Services like Ngrok create a secure tunnel from your local Raspberry Pi to a public endpoint on the internet, allowing you to expose local services (like SSH or VNC) to the outside world without configuring your router. This is incredibly useful for temporary access or when you don't control the router.
- Sign Up for Ngrok: Go to the Ngrok website and sign up for a free account. You'll get an authtoken.
- Install Ngrok on Raspberry Pi:
wget https://bin.equinox.io/c/4VmDzA7iaHb/ngrok-stable-linux-arm.zip sudo unzip ngrok-stable-linux-arm.zip -d /usr/local/bin sudo chmod +x /usr/local/bin/ngrok - Connect Your Authtoken:
ngrok authtoken <YOUR_AUTHTOKEN> - Start the Tunnel for SSH:
This will give you a public address (e.g., `tcp://0.tcp.ngrok.io:12345`). You can then SSH into your Pi using this address and port:ngrok tcp 22ssh pi@0.tcp.ngrok.io -p 12345 - For VNC: If your VNC server is running on port 5900 (common default), you can tunnel it similarly:
Then use a VNC client to connect to the provided Ngrok address and port.ngrok tcp 5900
Keep in mind that Ngrok's free tier provides random public URLs that change each time you restart the tunnel. For more persistent access, you might consider a paid plan or Method 2.
Method 2: Virtual Private Networks (VPNs) for IoT (Tailscale or ZeroTier)
Services like Tailscale and ZeroTier create a secure, peer-to-peer mesh VPN that connects your devices directly, regardless of their location or the routers they are behind. This is arguably the "best remote IoT VPC SSH Raspberry Pi setup for free" as it creates a secure, private network for your devices.
- Sign Up for Tailscale/ZeroTier: Create a free account on their respective websites.
- Install on Raspberry Pi: Follow their official installation guides. For Tailscale on Raspberry Pi:
curl -fsSL https://tailscale.com/install.sh | sh - Authenticate Your Pi: After installation, run `sudo tailscale up` and follow the instructions to authenticate your Pi with your account. It will provide a unique IP address within your Tailscale network.
- Install on Your Client Device: Install the Tailscale/ZeroTier client on your laptop, phone, or other device you'll use for remote access. Authenticate it as well.
- Access Your Pi: Once both devices are on your Tailscale/ZeroTier network, you can access your Raspberry Pi using its private Tailscale/ZeroTier IP address (e.g., `ssh pi@100.x.y.z`). This works for SSH, VNC, web servers, or any other service running on your Pi, as if they were on the same local network.
This method offers excellent security and ease of use, making it ideal for persistent remote IoT management.
Setting Up VNC for Graphical Access
If you prefer a graphical interface for your remote Pi, setting up VNC is crucial:
- Install RealVNC Server on Pi:
sudo apt update sudo apt install realvnc-vnc-server - Enable VNC: Go to `Menu > Preferences > Raspberry Pi Configuration > Interfaces` and enable VNC.
- Set VNC Password: Configure a strong password for VNC access.
- Connect with VNC Client: On your remote device, download a VNC client (e.g., RealVNC Viewer). Use the IP address or Ngrok/Tailscale address of your Pi to connect.
Benefits of Your Free Remote IoT Setup
With the right tools, knowledge, and a bit of creativity, you can create innovative solutions that enhance your daily life. The advantages of setting up remote IoT control using a Raspberry Pi behind a router, offering free solutions, are immense:
- Unparalleled Convenience: Control and monitor your IoT projects from anywhere in the world, at any time.
- Cost-Effectiveness: By utilizing free tools and services, you can achieve powerful remote capabilities without recurring subscription fees.
- Enhanced Efficiency: Troubleshoot, update, and interact with your devices remotely, saving time and effort.
- Increased Security: SSH and VPN solutions like Tailscale provide encrypted connections, protecting your data and devices from unauthorized access.
- Flexibility: Experiment with various IoT projects without being physically tethered to your Raspberry Pi.
Real-World Applications and What You Can Do
The demand for remote IoT solutions has skyrocketed, and with your free Raspberry Pi setup, the possibilities are limitless:
- Smart Home Automation: Control lights, thermostats, and appliances.
- Security Monitoring: Access live feeds from your Raspberry Pi-powered security cameras.
- Environmental Sensing: Monitor temperature, humidity, or air quality in a remote location.
- Data Logging: Collect data from sensors and access it from anywhere.
- Remote Development: Work on your Raspberry Pi projects, deploy code, and debug from a distance.
Many users are looking for the best remote IoT behind router solutions tailored specifically for the Raspberry Pi, free of charge, and now you have the knowledge to achieve just that.
Conclusion
There you have it—a comprehensive guide to setting up the best remote IoT VPC SSH Raspberry Pi setup for free. By leveraging the power of Raspberry Pi combined with secure, free remote access tools like Ngrok or Tailscale, you can unlock a new level of control and flexibility for your IoT projects. Whether you’re a tech enthusiast, a DIY wizard, or just someone looking to save some cash, this setup empowers you to monitor, control, and interact with your IoT projects remotely, without incurring additional costs.
The potential for remote IoT VPC SSH Raspberry Pi setups will only grow, making now the perfect time to dive in. With the right approach, managing Raspberry Pi devices behind routers becomes a seamless experience, transforming how you interact with your smart devices. Start building, experimenting, and connecting—your remote IoT journey begins now!
Final Summary: This article provided a comprehensive guide on setting up free remote IoT access for Raspberry Pi devices located behind a router. It highlighted Raspberry Pi's suitability for IoT projects, explained the challenges of router-based access, and detailed two primary free methods: secure tunneling with Ngrok for temporary access and VPN-like solutions such as Tailscale for persistent, secure network connectivity. The guide also covered setting up VNC for graphical remote control and emphasized the numerous benefits and real-world applications of such a setup, empowering users to manage their IoT projects remotely and cost-effectively.
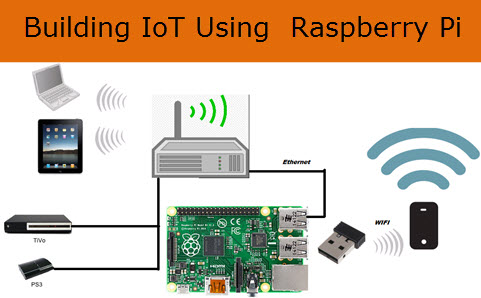
Building The (Internet of Things) IOT Using Raspberry Pi
Flirc remote raspberry pi - cgkesil

setup blynk local server on raspberry pi #iot - YouTube
